Lamchat Application Instructions for Apple.
Completed By: Laminar Communications Pty Ltd
Completed For: LamChat Users
Author: Monique Marbach & Jenna Cowan Date Issued: 23 June 2021 Status: Delivered Classification: Public Distribution: Lamchat Users
1. Download the LamChat App
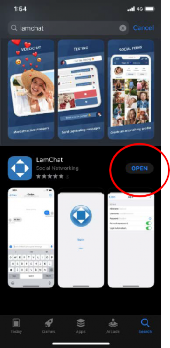
Go to the App store and search “LamChat“. Download the App. Once downloaded select “Open”.
2. Create an Account
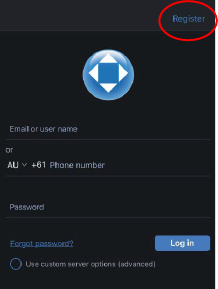
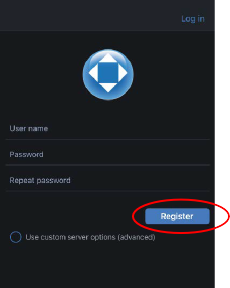
If you have already created an account, enter your details, and select “Log In”. To create a new account, select “Register”. On the next screen enter your details and select “Register” again. Be aware that your username and password are both case sensitive.
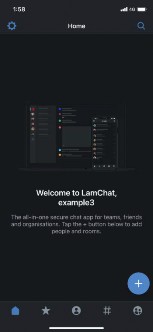
2.1. You are now a registered user, welcome to LamChat!
3. How to Chat
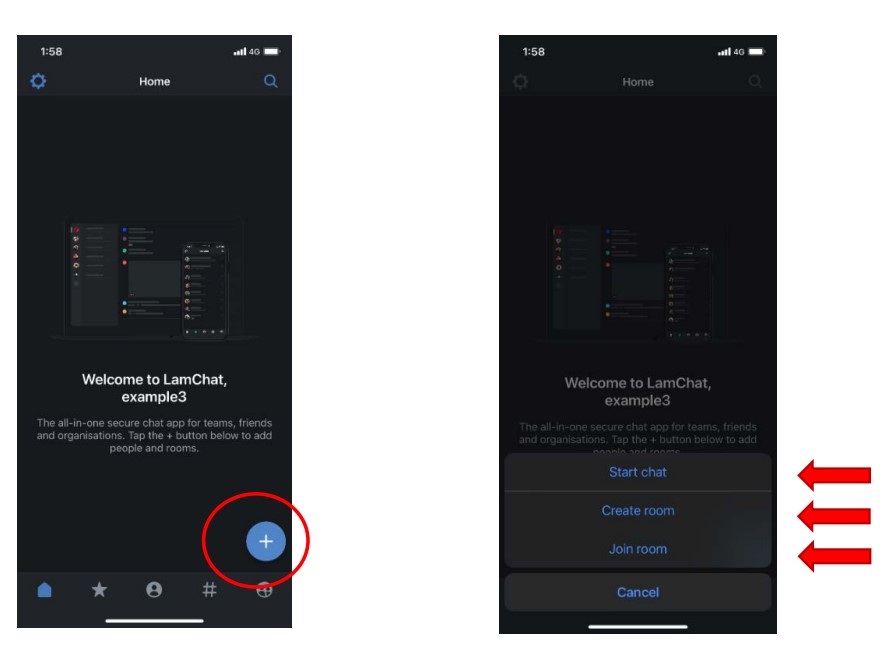
Whenever you start a chat with another LamChat user or start a Chat room (a group chat), your chat/conversation will automatically be secure. Chats between Users are automatically created as an end to end secure room.
To start a chat, select the “+” sign. To start a chat with an individual, select “Start Chat”. To start a group chat, select “Create Room”. To join an existing room, select “Join Room”.
3.1. Starting a Chat with an Individual
After selecting “Start Chat” the below screen will appear. Select “Invite friends to LamChat”. Enter the username of your friend with the extension “@example:matrix.lamchat.co”. For example, if my friend’s username is “john” his User ID would be @john:matrix.lamchat.co . Please remember that Usernames/User ID’s are case sensitive. LamChat may also try to import all your contacts so by selecting “Matrix Users Only” it will only bring up LamChat user accounts.
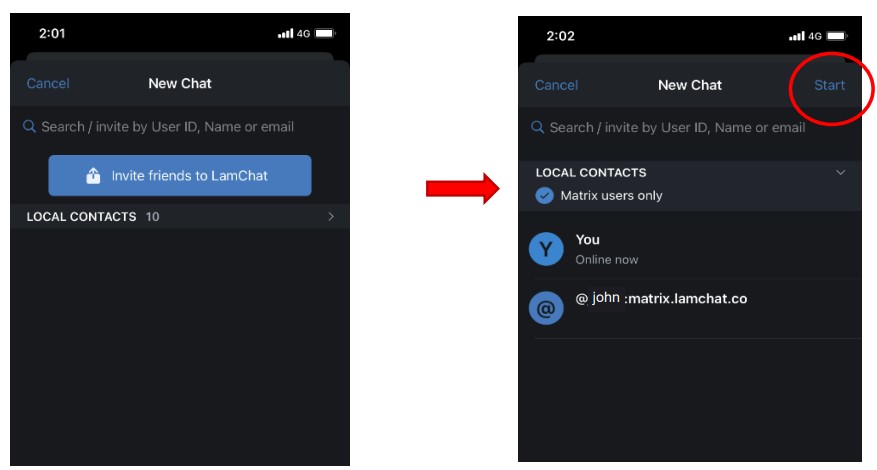
Select “Start” to open the conversation. The contact you have started the conversation with, has to accept the invitation to the Chat.
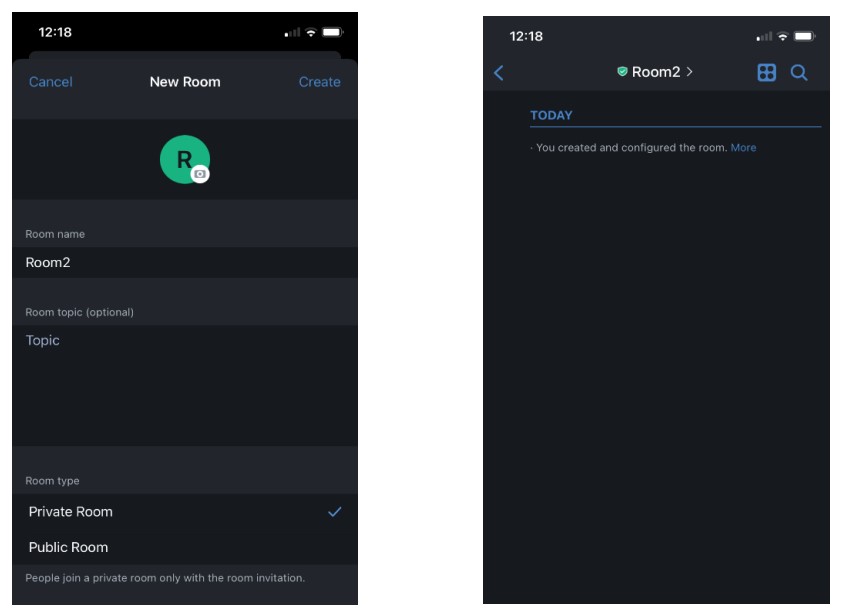
3.2. Creating a Room (Group Chat)
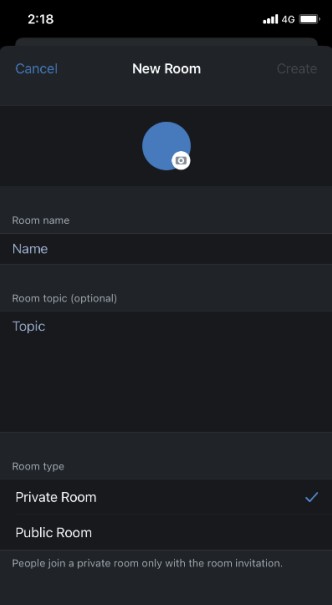
After selecting “Create Room” the below screen will appear. Enter the “Room Name” and optionally you can add a “Room Topic”. A “Room Type” allows you to set the room to either a Private Room or Public Room. The Private Room can only be accessed by invitation whereas the Public Room everyone can look it up and invite themselves.
Select “Create” to start the room. An example shown below of a Private Room called Room2.
3.2.1. Inviting People to a Room
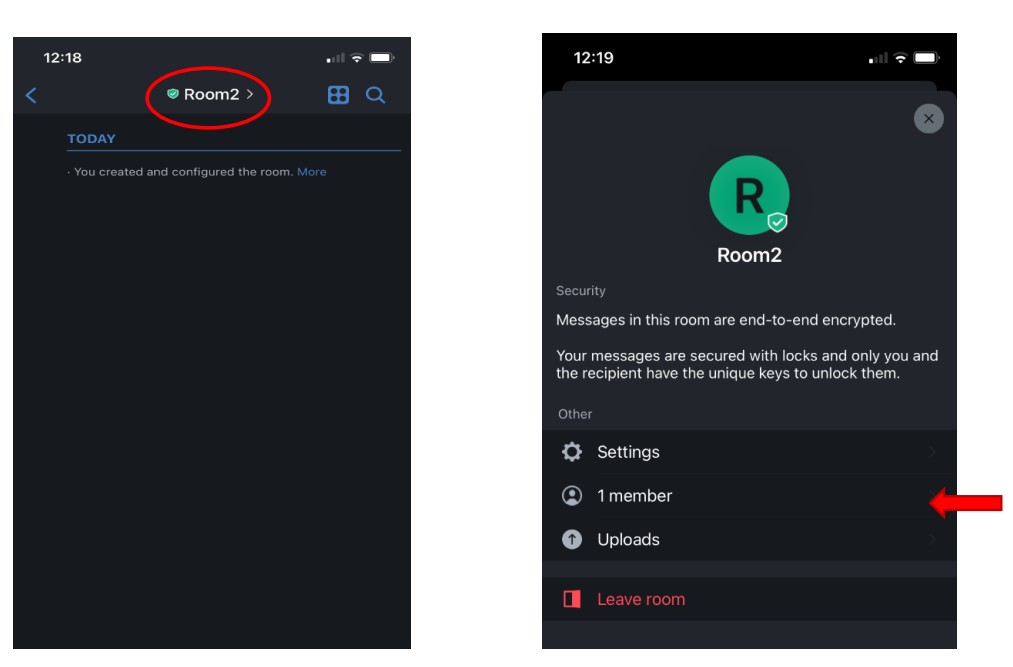
When you have created a new room or want to add people to an existing room select on the Room Name at the top of the screen. This will take you to the details of the Room. The second setting item will tell you the number of members. Select on this.
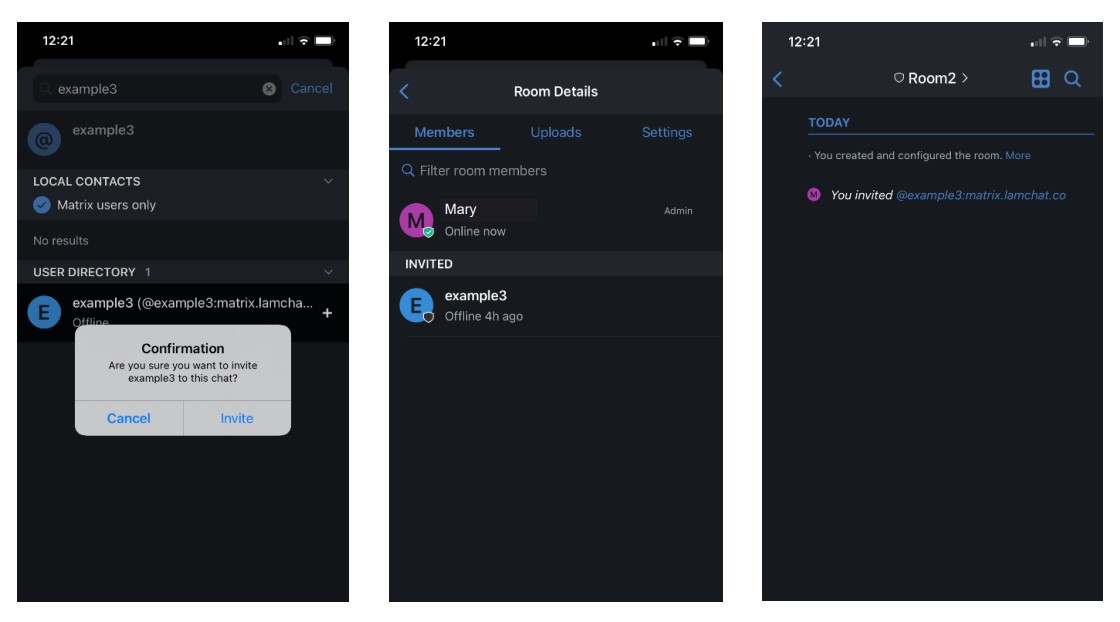
This screen will show you all the members and an “Add People” button will appear at the bottom right of your screen. Select on this. You can then search and invite people following the steps at “Starting a chat with an individual” explained at Section 3.1. An example is shown below searching for User ID @example3:matrix.lamchat.co

You may receive a popup as shown below asking you to confirm that you want this user added top your Room. Select Invite. The user will then appear in invited until they accept the invitation. When you exit settings and return to the room you will also see a record of your invitation and who you invited.
You can add people who you have not started a chat with, however they will only appear in the Room they have accepted and will not appear on your “People” list until you have started a direct chat with them.
3.3. Joining a Room (Group Chat)
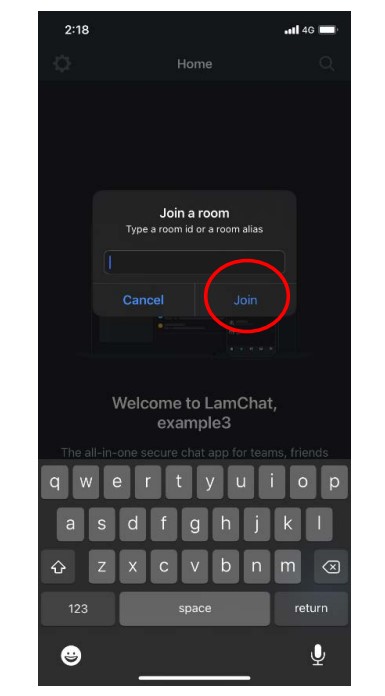
After selecting “Join Room” the below screen will appear. To join a room, enter the Room ID or Room Alias (which is the Room Name). Then select “Join”.
You can then search and invite people following the steps at “Inviting People to a room”.
Now you are setup in LamChat. For further details on the functions of the App please see the following pages. Happy Chatting!
4. Functions of the LamChat App
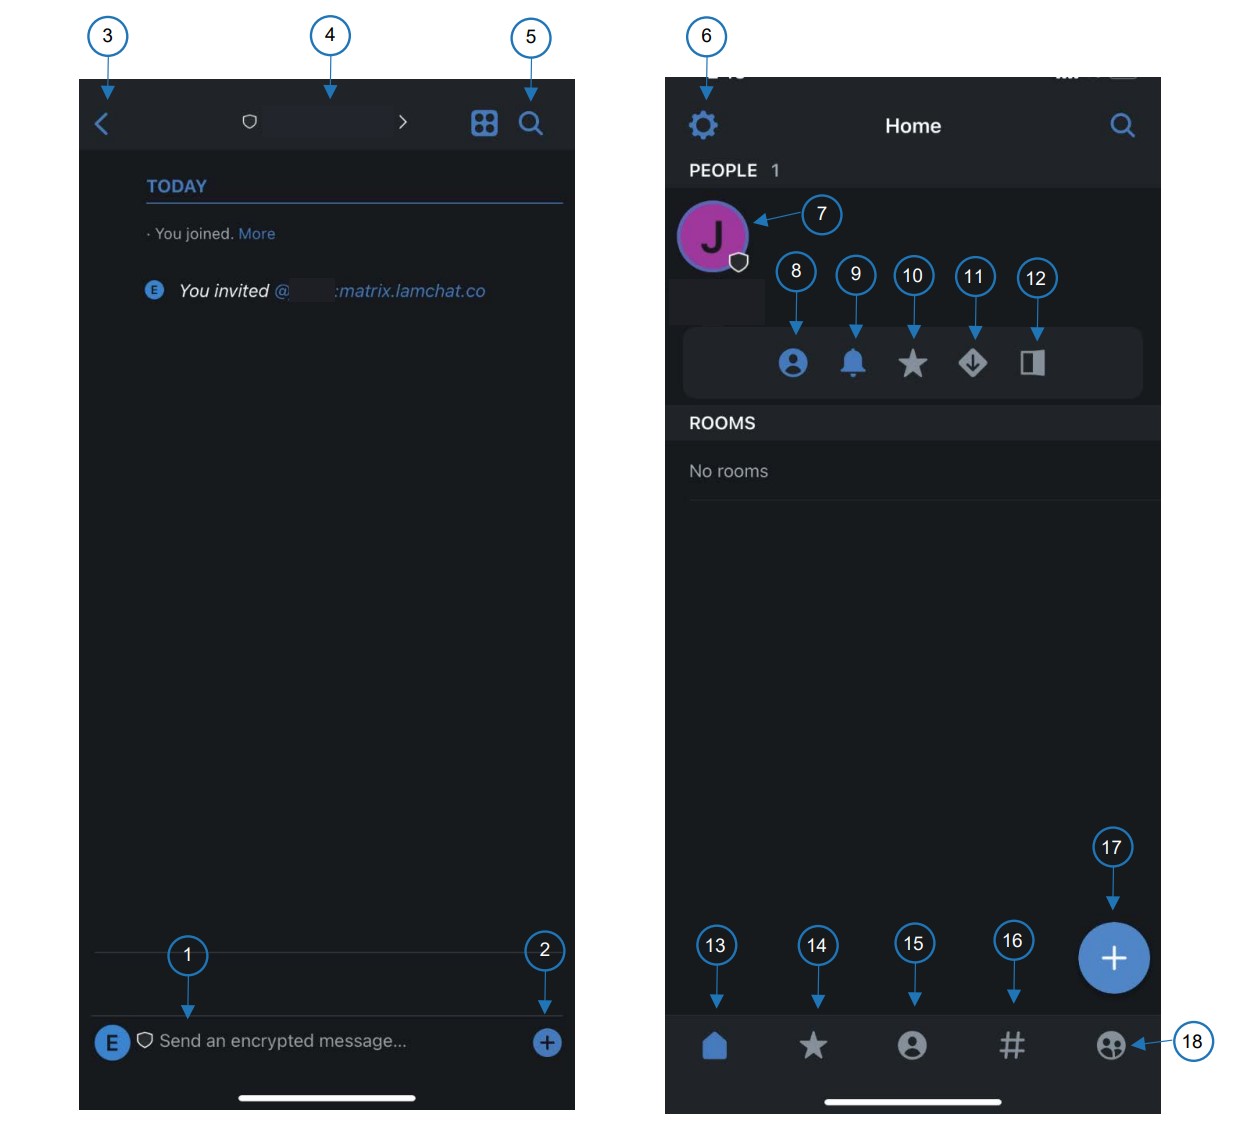
1. Text bar, press “Enter” to send 2. Take or send photo, emoji, sticker or send file 3. Search 4. Room Settings 5. Return to Main Screen 6. Account Settings 7. Notifications 8. Turn Chat into Room 9. Toggle Notifications 10. Favourite Chat 11. Lower Priority 12. Leave Room 13. Home Page 14. Favourited Chats 15. People 16. Rooms 17. Start Chat or Join Room 18. Communities
5. Linking Account for Password Recovery
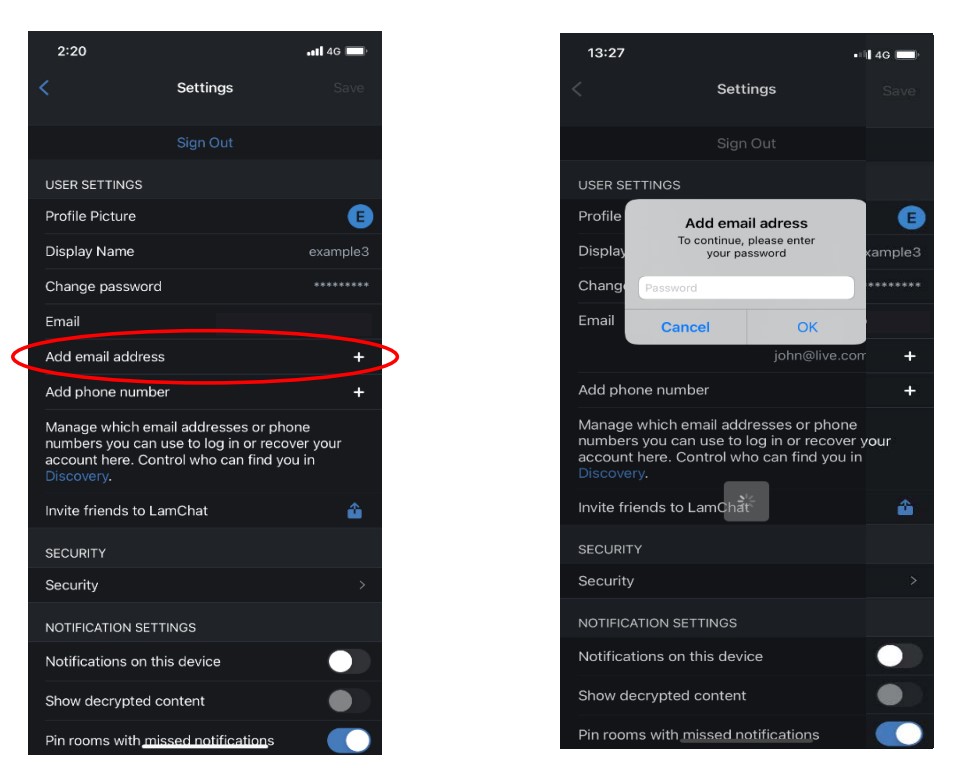
Linking an email address or phone number will allow for password recovery. If not linked upon creation an email can be added at a later time. In settings enter your email address as shown below and press the “+”. You will then get a pop up asking for your email password. Enter and select “OK”.
You will then get a pop up stating Verification Pending, select continue.
The email address you have entered will receive a confirmation email. Go to your email inbox and select the link as shown below. Once it is clicked it will activate the email to link it with your LamChat account.

6. Password Recovery
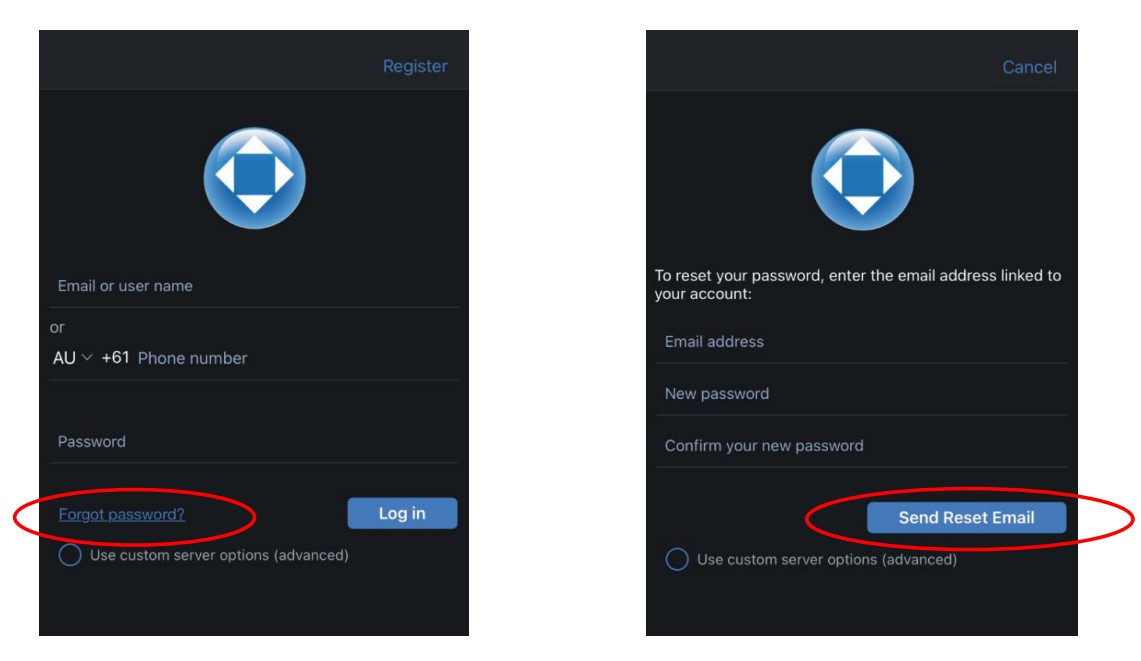
If an Email address has been linked the password can be changed. As your messages are encrypted, they will become unviewable. If you want to view any historic messages you will need to have setup your key backup per Section 8 before carrying out the Password Recovery process. Select “Forgot password”, enter email address and new password then select “Send Reset email”.
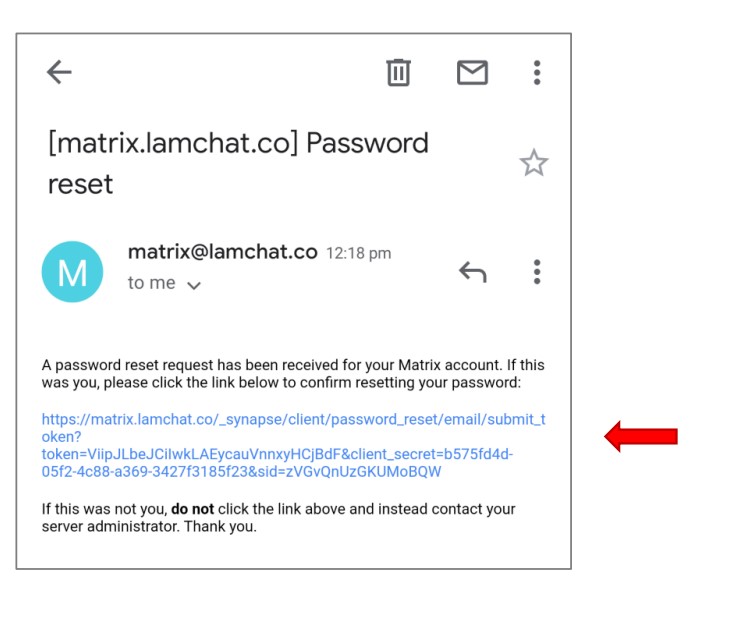
The email address you have entered will receive a reset your password email. Go to your email inbox and select the link as shown below.
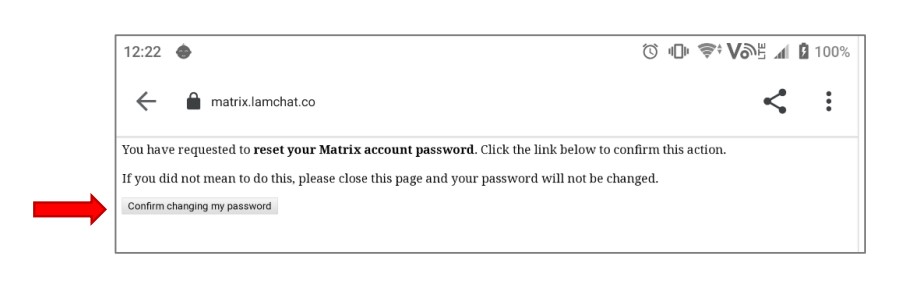
Once it is clicked a browser will open as shown below. Select the “Confirm changing my password” button.
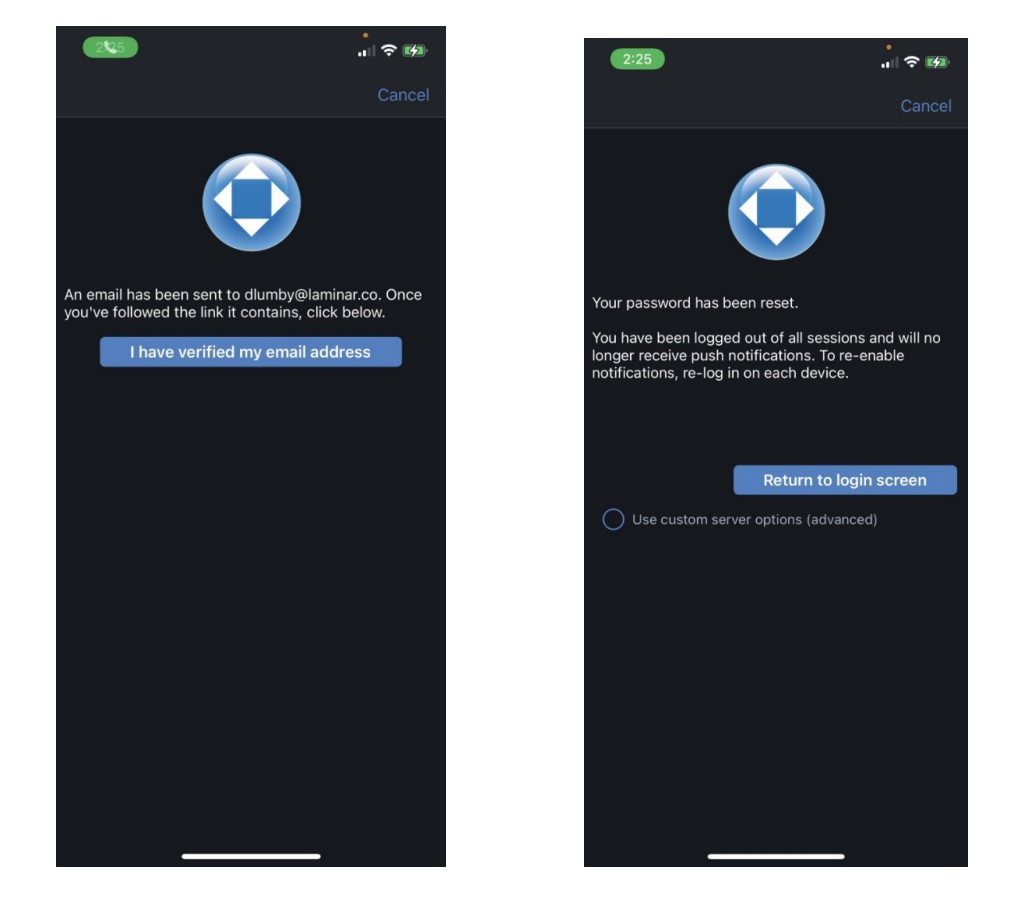
The below confirmation will then appear.
Return to the LamChat App and select “I have verified my email address” as shown on the left below. When you see the confirmation on the screen as shown on the right below, you have had success! Your new Password is now activated. “Select return to login screen” button.
7. Verifying Account
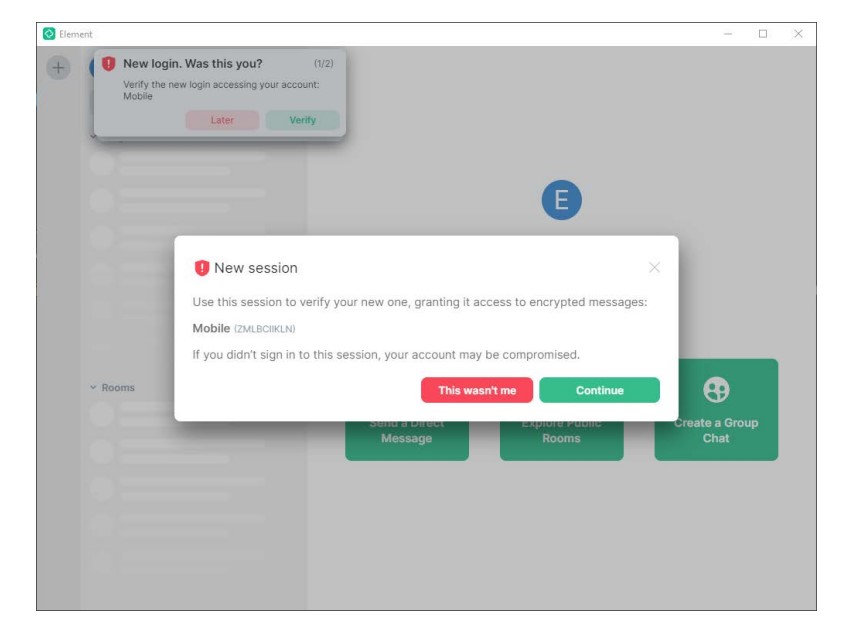
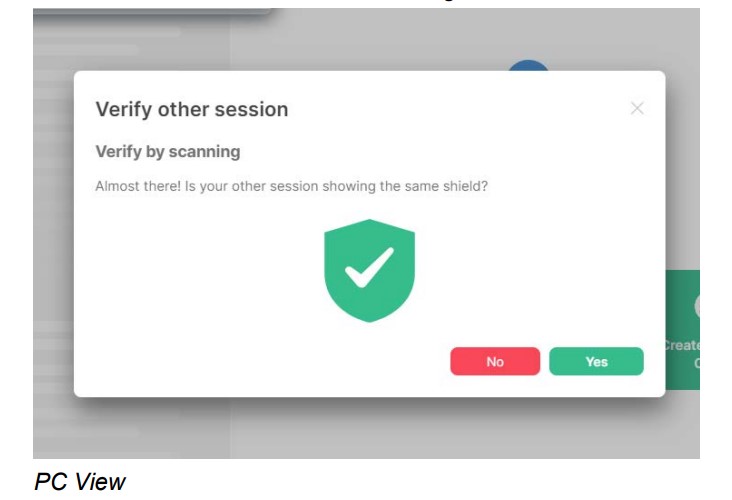
When logging into any secondary device for the first time (eg you have logged in on LamChat App and are now logging in on PC, or vice versa) a notification will pop up to try and verify your additional device. Example is shown below from PC when phone was logged in first. Select “Continue” to begin verification.
A QR code will appear that can be scanned by phone. You will get a popup directly from the LamChat App asking if you want to scan the QR code.
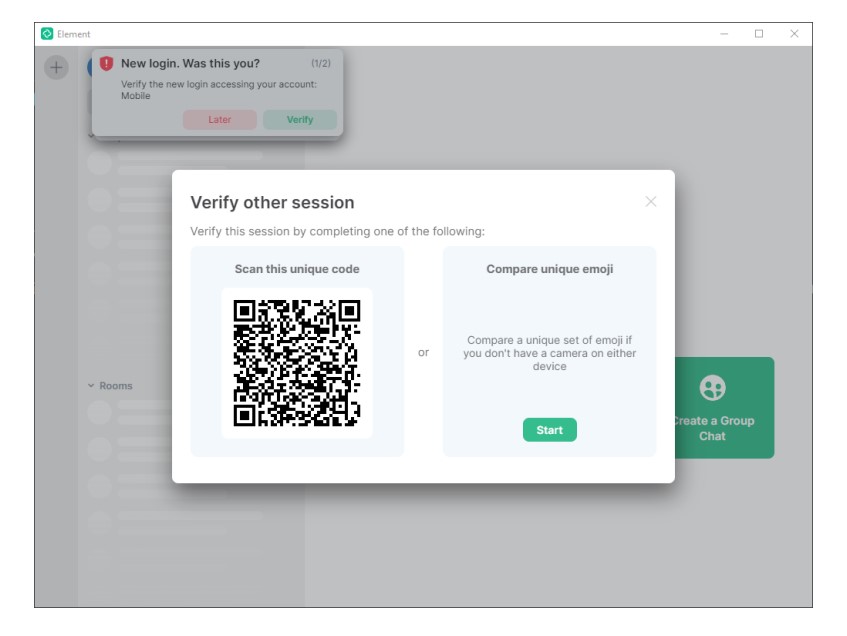
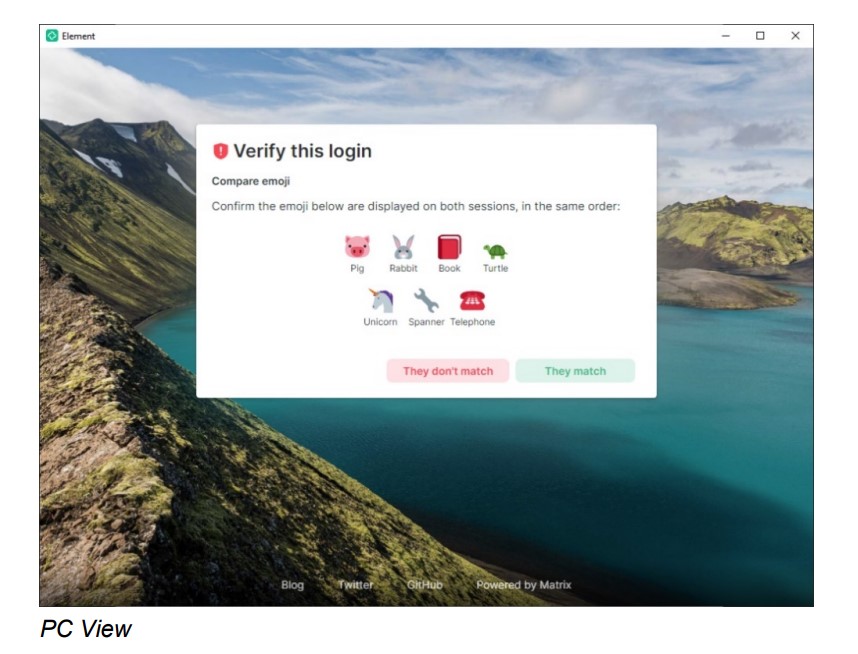
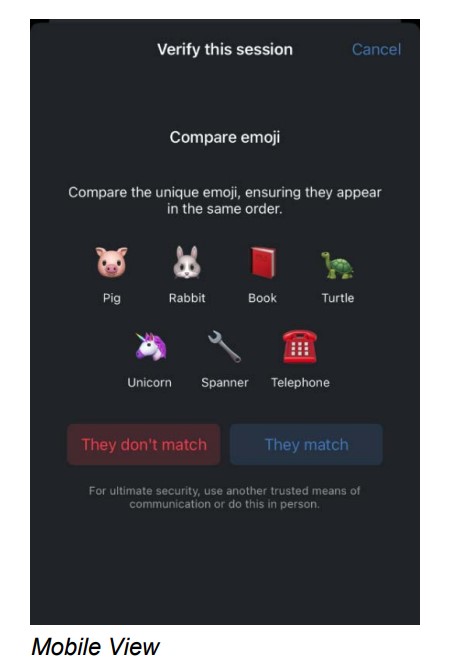
If you are unable to scan the QR code you can verify the login with “Compare Unique Emoji”. A unique sequence of emojis will be displayed on both devices, so you can compare them to verify.
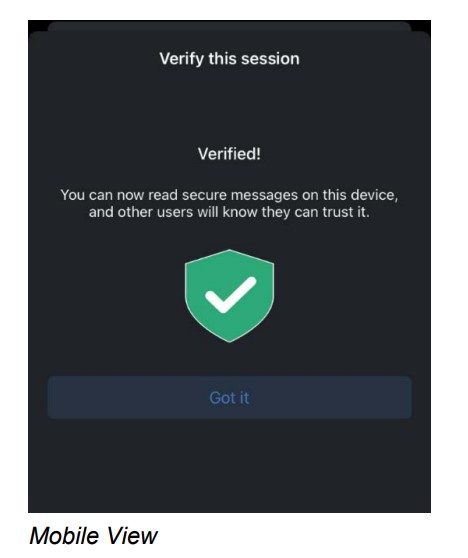
Once verified both devices will show a green shield. Select “Yes” and “Got It”.
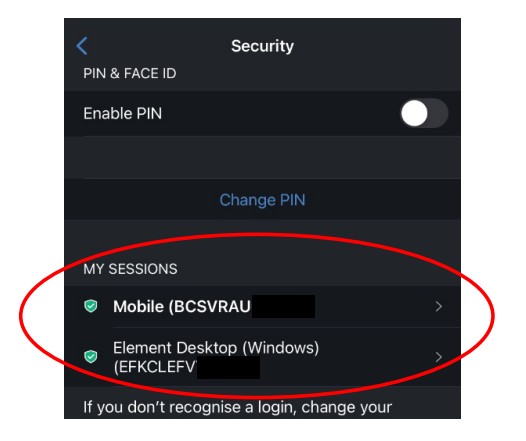
Verified session can be checked in the settings, within security as shown below. You can see there is both a mobile and desktop connected with your LamChat account.
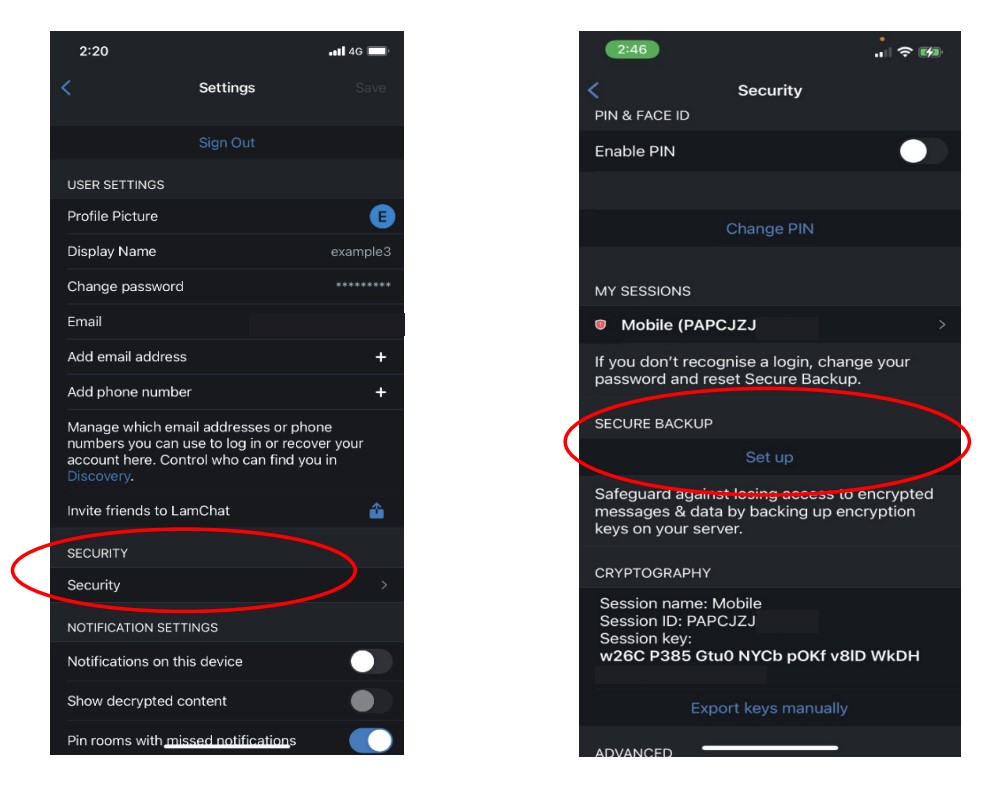
8. Secure Backup
As LamChat is a secured application there is a process involved with keeping your device encrypted, whilst still being able to access your data, that is your messages and conversations.
To create a backup you will have to create a backup of your encryption keys (before logging out of your devices) by completing the following steps.
Open “Settings”, select on “Security”, the screen will appear as below. Go to “Secure Backup”.
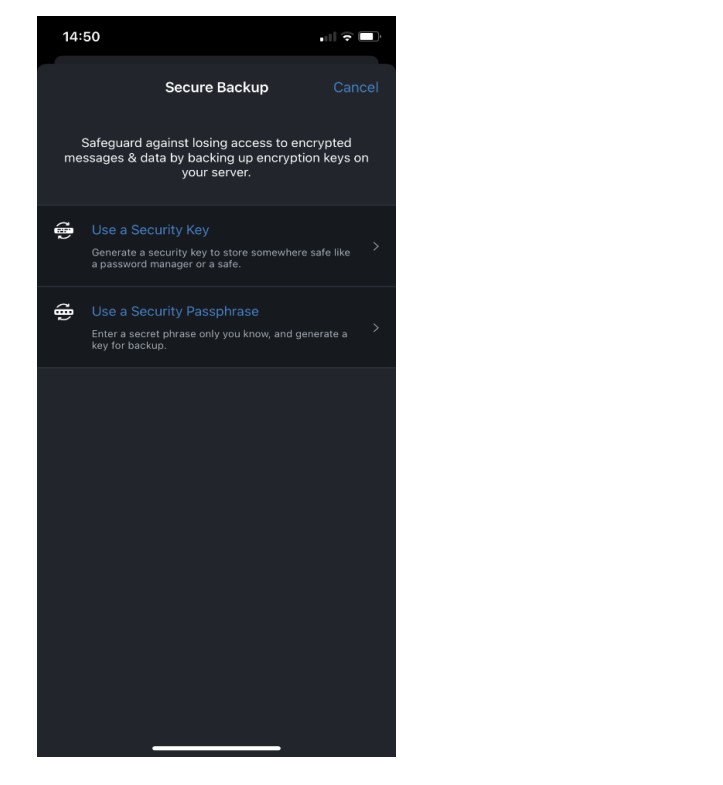
This will open the “Secure Backup” screen as below. There are two ways to backup your encryption keys. You can use a Security Key or a Security Passphrase. These are essentially Passwords. A Security Key will be an auto generated password that you can store securely somewhere. A Security Passphrase will be a self created Password that you will need to remember.
8.1. Use a Security Key
Select on “Use a Security Key”. This will create your autogenerated Recovery Key. Select save to store your key.
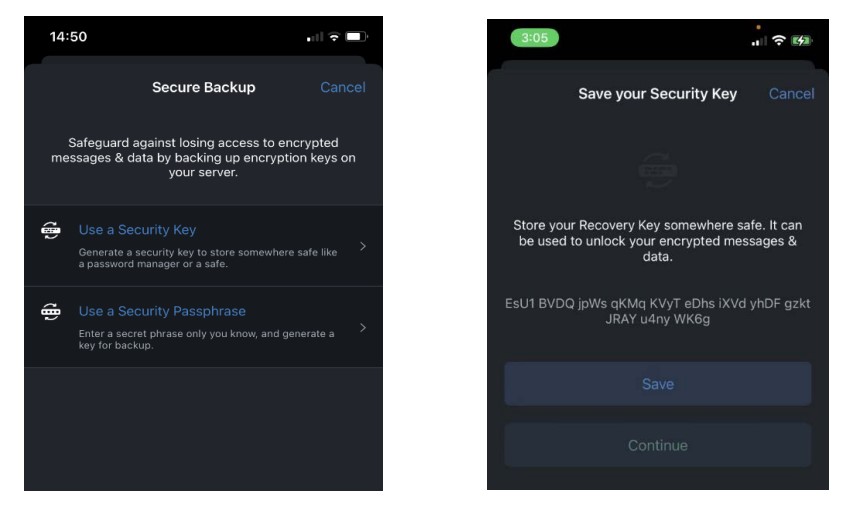
Ensure you store it in a very secure location as suggested in the popup below. Select Continue. When you exit Settings and re-enter you will see the “Synchronise” Button instead of “Setup” so you know this process has been completed.

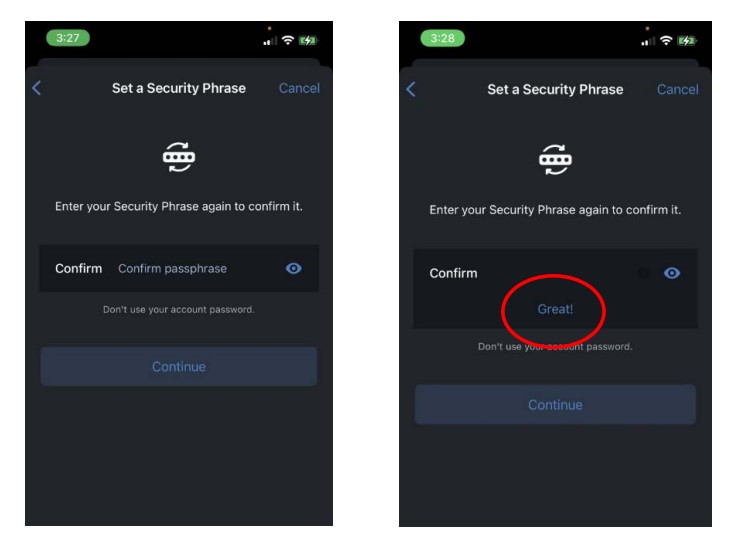
8.2. Use a Security Passphrase
Select on “Use a Security Passphrase”. This will open the below screen to allow you to create your own Password. It will move to the second screen below to ensure you create a strong password. Select “Continue”.
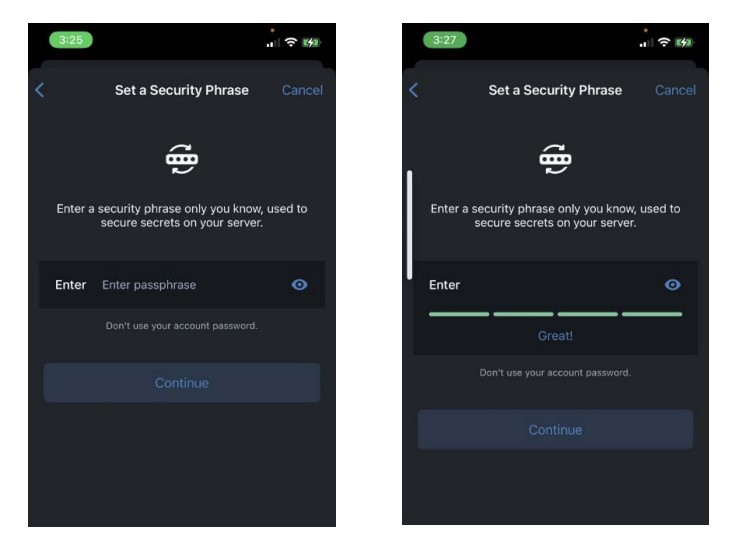
Re-enter your Passphrase as confirmation and select “Continue”. It will confirm with the word “Great!” once you have entered your Passphrase correctly, as shown below.
To back up manually without using the matrix server the keys can be exported manually. Go to security settings and select “Export Keys Manually”.
8.3. Complete Secure Backup
Within Security Settings, select “Synchronise”. This will open the Recovery Key Page. Enter your Security Key or Passphrase (whichever one you set up) and select “Use Key”.
